This is the second in a series of postings about the Makezine controller. The first one was the Jedi Cursor.
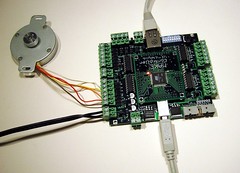
Most 5.25" floppy disk drives have a stepper motor in them for positioning the head, plus interesting widgets like optical emitters and detectors. With a little bit of work, they can be removed and put back into service with your Makezine controller. I put together a set of photos showing how I disassembled my floppy disk drive and removed the useful bits.
A stepper motor has magnets, poles, and windings. The windings go around the poles, and you energize the windings in a specific order to make the motor turn in one direction or the other. A motor can have four, five, or six wires coming out of it. You will need to use an ohmmeter to determine the meaning of the wires.
- A stepping motor with four wires has only two windings and is bipolar. You have to be able to drive it with positive and negative voltages. In order to make the magnets spin around, you need to energize the windings with positive and positive, then negative and positive, then negative and negative, then positive and negative. You don't have to worry about which pairs of wires go with which winding. Just hook all four up to the digital outputs.
- A stepping motor with five wires has four windings and is unipolar. One of the wires is a common connection for all four windings. It will have the same resistance to the other four wires. Connect that wire to ground and the other four to the digital outputs.
- A stepping motor with six wires has four windings and is unipolar. One of the wires is a common connection for two of the windings, and the other for the other. It will have an equal resistance measurement to two other wires, and infinite resistance to the other three. Connect both common connections to ground, and the other four to the digital outputs.
Once you have the motor connected, you will need to drive it with the correct sequence. Fortunately you can't hurt the motor by giving it the wrong sequence. It will just flail around helplessly. In the program below, the sequence is set by "order". It lists the digital output numbers in the order of the windings. Keep trying orders until the motor continuously turns in a circle. Note that the software requires the last of five be the same as the first. Uses an extra entry to keep the code clean.
Run the program like this. Servo.py emits the OSC commands in the proper order and schedule. sendOSC hands them off to the Makezine controller.
./servo.py | (trap "" SIGINT;osc/sendOSC/sendOSC -h 192.168.0.200 10000)
#!/usr/bin/python
"""servo.py -- runs the servo around and around"""

import time, sys

# set this to false to see the LEDs light up like the windings are energized.
if True:
    service = "digitalout"
    command = "value"
    order = [ 4,5,6,7,4 ]
else:
    service = "appled"
    command = "state"
    order = [ 0,1,2,3,0 ]

set = "/%(service)s/%%s/%(command)s " % locals()
set0 = set + "0\n"
set1 = set + "1\n" + set + "1\n"
set2 = set + "0\n" + set + "1\n"

pausetime = 0.05

def run():
    for i in range(0,4):
        sys.stdout.write(set1 % (order[i], order[i+1]))
        sys.stdout.flush()
        time.sleep(pausetime)
        sys.stdout.write(set2 % (order[i], order[i+1]))
        sys.stdout.flush()
        time.sleep(pausetime)

try:
    while True:
        run()
except KeyboardInterrupt:
    for i in range(0,4):
        sys.stdout.write(set0 % (order[i]))
        sys.stdout.flush()
posted at: 01:48 | path: /opensource | permanent link to this entry
